Labels

Friday, April 24, 2020

How to Cook Beans that are Tender, Creamy, and Nearly Perfect


This is a recipe I included in Near & Far in 2015 inspired by a trip to Italy a few years prior to that. It’s arguably the best way I know to cook beans, a version of the much-loved Tuscan bean recipe – fagioli al fiasco. And it’s the method I always return to. Traditionally, beans were baked overnight in a Chianti bottle placed near the embers of that night’s fire. While not exactly authentic (no fire here), I do a riff on the general idea, using a low-temperature oven and enamel-lined pot. The technique couldn’t be simpler and if you want to know how to cook beans that are beautifully luxe, tender, and creamy this is the recipe to try.How to Cook Beans that are Tender, Creamy, and Nearly Perfect

What kind of Beans to Buy?

The beans pictured here are Rancho Gordo cranberry beans. Velvety and thin-skinned they are an absolute dream to cook with. You can also use cannellini or cassoulet beans. I mean, in all honestly, most beans cooked this way are going to be wonderful. The main thing I would pay attention to is source. Buy beans from a place that has good turnover, or from a farmer or company you know and trust. Buying beans that have been sitting around or stored for years can be a problem. The beans stay tough, etc. 
How to Cook Beans that are Tender, Creamy, and Nearly Perfect

The Magic of Bean Broth

The key to these beans is their simplicity. It’s one of those occasions where you just really need to keep it basic. Use good beans, good garlic, and good olive oil. The gentle, steady heat of your oven will coax the handful of ingredients into a beautiful, brothy pot of beans. Keep in mind, the bean broth is special in its own right, and I love to sip it straight from the pot. It’s freckled with chile flakes and dotted with olive oil and you should savor every tablespoon of it. The bean broth here is somehow exponentially better than when I cook beans on the stovetop. 
How to Cook Beans that are Tender, Creamy, and Nearly Perfect

Ideas Related to Serving Beans

You can enjoy these beans on their own, use them to top bruschetta, or ladle them over pasta. We had them for lunch this afternoon on top of fresh-off-the-comal masa tortillas that had been slathered with avocado and a smear of a Cali-style chermoula sauce. In fact, that’s what we’ve had for lunch the past three days. Laugh/cry.

Leftovers! I used the last of this pot of beans in an impromptu casserole by tossing 2/3 beans (and broth) with 1/3 leftover short pasta and a bit of torn mozzarella in an 8×8-inch baking dish. Top with a bit more cheese, lemon zest, scallions, and lots of herby bread crumbs. Bake, covered for 35 minutes or until bubbly and hot. So good! It was just right served alongside asparagus and a simple salad. Bad picture below!

How to Cook Beans that are Tender, Creamy, and Nearly Perfect
If you’re interested in an Instant Pot version of this recipe, I’ve got you. And if you’re looking for other basic, pantry-friendly recipes, have a look at the rice recipes (particularly this green rice), or these pasta recipes (this pasta with creamy crushed walnut sauce is quite popular rn). There are also a lot of bean recipes in the archives, don’t miss this simple farro & bean stew, this carrot, dill & white bean salad, and ribollita is always a crowd-pleaser. If you’re interested in seeing me cook these, I’m going to post the video here (under the Cooking III highlights). Please enjoy!

Continue reading How to Cook Beans that are Tender, Creamy, and Nearly Perfect on 101 Cookbooks

101 Cookbooks https://ift.tt/2Smbb8r

Tuesday, April 21, 2020

Fluffy Pancakes


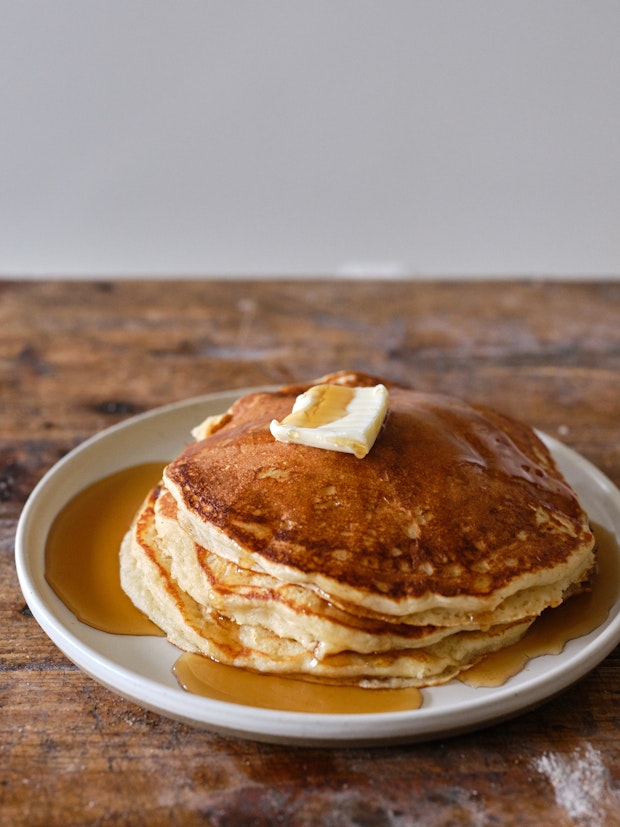
I first posted this pancake recipe it 2006, and figured it was time to elaborate a bit. It’s a recipe I use it a lot, resulting in a beautiful, classic stack of pancakes with impossibly tender crumb and golden edges. The pancakes have lightness and lift, and good color. That said, the real reason I love this recipe is because it’s endlessly adaptable. I’ve used it as a base pancake recipe and jumping off point for endless pancake adaptations and I heartily encourage you to do the same. You can experiment with a range of flours, liquids, and add-ins, and I list off a number of suggestions below.
Fluffy Pancakes Recipe

Buttermilk, Yogurt, or Milk? – use what you’ve got!

You can make these pancakes with just about any liquid you have on hand. I’ve listed them in order of preference. Buttermilk is wonderful, but yogurt works like a dream too. Not everyone keeps buttermilk on hand, but many people have a cup of yogurt. Go for it! Thin Greek yogurt with an equal amount of water, so for this recipe I’d combine 1 cup + 2 tablespoons Greek Yogurt with the same amount of water. If you’re using a standard yogurt don’t bother thinning it.

Both of the above (buttermilk or yogurt) are A-plus choices. Don’t have other of those? Dairy milk, oat milk, and almond milk will all give you good results. When using one of these, allow the batter to sit for 5-10 minutes before cooking, allowing the batter to thicken a bit.

Experiment with Different Flours in Your Pancakes

I’ll start by saying, you can use all-purpose flour in these pancakes. But, by all means, experiment with more nutritious whole-grain flours if you have them (I have suggestions below and in the recipe). White whole wheat flour works wonderfully here. It’s the Trojan horse of whole-grain flours, because for finicky people who won’t eat anything brown or wholesome you can pass it off as white. It is made from a strain of hard white winter wheat berries and the nutritious bran and germ aren’t processed out the way they are in all-purpose white flour. The white whole wheat flour makes for a tender crumb.

Rye Pancakes: Replace about 1/2 of the all-purpose flour with rye flour.

Oatmeal Pancakes: Replace 1/3 cup of the flour with quick cooking oats or oatmeal you’ve blitzed int a blender. These are particularly good with slices of banana cooked in. Sprinkled with a bit of brown sugar in place of syrup.

Tiny Grain Pancakes: Stir 1/2 cup cooked quinoa or millet into your batter.

Blueberry Beet Pancakes (Vegan):  If you’re looking for a colorful vegan pancake variation – hearty, substantial, delicious, and kid-friendly. 

Variations From other Cooks

A number of you have left helpful comments for tweaks and variations to this recipe over the years and I wanted to list off a couple:

Lactose Intolerant: Jenny noted, “I just made these this morning for my lactose-intolerant twins, substituting the 2 1/4 C buttermilk for 1C soy milk. They were absolutely awesome! I ground 2 C wheat berries, which made 4C flour, and doubled the recipe for my large family.” 

Lots of Bran: Rachael says, “I would really encourage you to try adding bran to your waffles or pancakes next time. I substitute up to half of my flour with bran (sometimes have to reduce the liquid a bit or add in something thicker, like yogurt, because the bran doesn’t absorb milk)… it lends a wonderfully nutty flavor to things and it lightens the texture substantially, not to mentioned the good-for-you fiber.

Extra Credit Fluffy

I’ve tweaked the recipe here to have you separate your eggs, and beat the whites into fluffy peaks. It’s an annoying step, and requires extra effort, but is arguably worth it. You fold the whites into your batter as a last step before cooking, and it adds a really nice lightness to the pancake batter. That said, if you’re not feeling up to it, no big deal – lightly beat the two eggs and add them to the liquid mixture.
Fluffy Pancakes Recipe

Favorite Toppings for your Pancakes

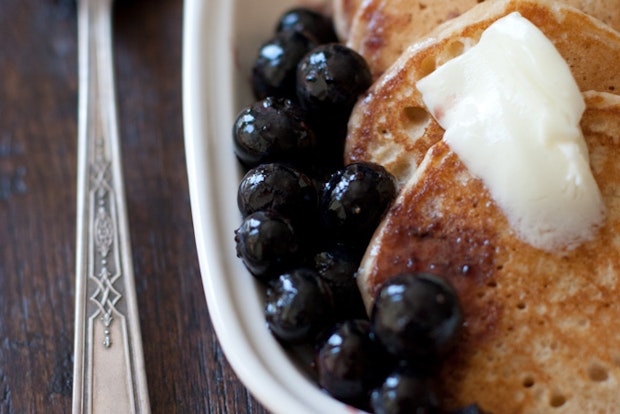
Whole Blueberry Maple Syrup: This is my favorite syrup for these pancakes and worth the bit of extra effort to make. It’s delicious, fragrant and beautiful without being overly sweet. To make blueberry maple syrup put half of a 6-ounce basket of blueberries, 1/4 cup sugar, 1/4 cup maple syrup, and 2 tablespoons of water in a medium saucepan over medium-low heat. Heat and stir until the sugar dissolves. Simmer for 5 or 6 minutes or until the blueberries begin to split. Remove from heat and press the blueberry mixture through a fine strainer into a bowl. Mash the fruit to get all the juiciness extracted. Throw out the solids. Stir the remaining blueberries into the warm syrup and set aside. You can use whatever sugar you like here – white, brown, coconut sugar, etc.

Churro-style Cinnamon Sugar: Combine 2 tablespoons cinnamon with 1/2 cup sugar and stir well. Sprinkle generously across hot buttered pancakes. You can experiment with the sugar blend beyond this as well, adding a pinch of ground cloves or curry powder, and/or crushed rose petals.

Tasty Add-Ins

Berries: If you’re adding berries to your pancakes, add them to your pancakes after they’re on the griddle. This way your pancake batter retains its color.

Bananas: If you’re adding slices of banana to your pancakes, add them after the pancakes are on the griddle.

Boosts: Adding a boost of oat bran, wheat germ, nutritional yeast, kale or beet powder, hemp or flax seeds is always an option. I usually start with a tablespoon or two.

Some Cooking Tips

My pan of choice for pancakes is cast iron, but any pan that holds steady heat is fine. The key is getting and maintaining the right temperature. Too much heat and you end up with burned pancakes that are under-cooked in the middle. Too little heat, and they take forever to cook, and they end up with a bit dry with a toughened crumb. I tend to start  at a lower temperature than I think I’ll want, and creep it up from there.

Keep Those Pancakes Warm!

Unless you have a griddle, or multiple pans going, you’re going to need make your pancakes in batches. And you don’t want your first round to go cold while you’re making the next. If you have a cooling rack you use for cookies, you can deploy it here. Place pancakes, preferably in a single layer, on the cooling rack after transferring from the skillet, and place them in a 200F oven to keep warm. I like the cooling rack better than a plate because it allows air to circulate around the entire pancake. This way, the bottom sides of the hot pancakes won’t get soggy.

Enjoy the pancakes! If you’re looking for breakfast recipes don’t miss this healthy granola, or the best waffle recipe (seriously!), these homemade cinnamon rolls, a loaded frittata, tofu scramble, Herb Cream Cheese Scrambled Eggs, and the baked oatmeal is always popular. Ooh – I also love this Cinnamon Vanilla Sunflower Butter on freshly baked toast. 

Continue reading Fluffy Pancakes on 101 Cookbooks

101 Cookbooks https://ift.tt/3bqiUcQ

Friday, April 17, 2020

Pasta with Creamy Crushed Walnut Sauce


This is the best thing I’ve cooked with the least amount of effort in the past month. Most of my lazy lunches never make it to the site, but this pasta is an exception. If you have a favorite dried pasta, a few cloves of garlic, walnuts, and black pepper you can make it too. The other ingredients – lemon zest, a bit of grated cheese, a finishing cascade of breadcrumbs and herbs are encouraged, but not essential. It’s the kind of meal that checks the box when you’re in the mood for creamy pasta, but no cream is needed. You get rich, nutty, walnut sauce from pounding garlic and toasted walnuts into a paste and thinning with a good amount of salted pasta water. Peak comfort food.

Pasta with Creamy Crushed Walnut Sauce

What type of pasta to use?

I vote for short pasta here, preferably something whole grain and somewhat rustic. The pasta you see pictured is emmer reginetti. I grabbed it on a whim the first time I cooked this and it worked beautifully for this recipe. The way the ruffles catch just the right amount of creamy walnuts is a thing of beauty. That said, play around with different pastas, and experiment with shapes you love. Fusilli might be great, or even little shells.

Pasta with Creamy Crushed Walnut Sauce

Variations:

Experiment with other nuts: You might be able to do a nice alternative version of the walnut sauce with toasted almonds, or toasted pecans instead. Or a blend of whatever nuts you have available. I’ve been doing 100% walnuts but suspect using other nuts would be great. The key is seasoning well – salt, pepper, and a bit of lemon juice. Take your time getting this part right.

Add some green! Throw a bunch of broccoli florets or asparagus in to the pasta pot at the last minute to add a veg component to this without getting another pot dirty. We were out of both (yikes) or you would have seen one of them make an appearance here.

Leftovers! Make a quick pasta & bean stew if you have leftovers. Combine the walnut-y pasta with some white beans in a saucepan. Add good tasting broth, heat, season, and add a bit of grated cheese to bring it all together. A handful of well-chopped kale wouldn’t be unwelcome.
Pasta with Creamy Crushed Walnut Sauce

More Pasta!

If you need more pasta inspiration try this Pasta with Etruscan Sauce, or my favorite go-to tomato sauce (for pasta & pizzas), Curried Tomato Tortellini Soup, or Pasta with Smashed Zucchini Cream (in summer). A fun project is making homemade gnocchi, but if that’s a bit too ambitious try this Last-Minute Lasagna recipe, Orzo Super Salad, or family-favorite stuffed shells. There’s also a huge archive of pasta recipes and dinner ideas!

Continue reading Pasta with Creamy Crushed Walnut Sauce on 101 Cookbooks

101 Cookbooks https://ift.tt/3bh6B2E

Wednesday, April 15, 2020

How to Dry Herbs


This is the time of year I find myself drying herbs. In part, it’s because I tend to come across special, unusual varietals in the spring and late into summer – caraway thyme, pineapple sage, fresh coriander. Some will appear for a week or two, then aren’t seen again for another year. Other times, it is the herb flowers that get me – I like to use them throughout the year, and the one way to guarantee a supply is to dry them. It couldn’t be simpler, so I thought I’d share my method for those of you who may have missed it the last time I wrote about it.

How to dry herbs

Group Herbs into Small Bunches

I tend to group any herbs I’m going to dry into small bunches. Leaves are stripped from the bottom few inches of each stem, and a bit of twine secures each bundle. A push pin or strip of washi tape is typically enough to secure the herbs anywhere high and dry – walls, bookcases, fireplace mantles, cabinet knobs, and the like are all fair game around here.

How to dry herbs
A Pro-tip

Leave a few inches of extra string when you tie the herbs to dry them. The stems will become dehydrated, and lose a bit of volume. The extra string will allow you to re-tie the herbs more snuggly if needed without starting over. Kelly left a comment below that caught my attention, “I use rubber bands (recycled from foods like asparagus or carrots that come banded together) instead of twine. That was the rubber band contracts as the herbs dry and i don’t have to adjust the twine or clean herbs off the floor!” I haven’t tested it yet, but it sounds like a winner.

How to dry herbsHow to dry herbs
To dry chive flowers, you’ll want to trim them from their stems and place on a flat surface for a week or so. Toss every couple of days so that all sides are exposed to air.How to dry herbs

How to Store Dried Herbs

Be sure your herbs are completely dried before transferring them to a sealed container. Any moisture can result in mold. Store in a cool dark place. Also, after a few days of drying, your herb bundles will contract a bit from dehydration. Per the tip above, you may need to tighten the twine a bit.

Let me know if you have favorite herbs I should try to seek out. I love the offbeat, slightly unexpected thymes, sages, and lavenders. I’m sure there there are others I should know about as well!

Continue reading How to Dry Herbs on 101 Cookbooks

101 Cookbooks https://ift.tt/2yg4tcH

Tuesday, April 14, 2020

Spoon Butter


I have a good number of wood cutting boards, wood-handled knives, and wooden spoons in my kitchen, as I’m sure most of you do. One of the things that bothers me most about caring for them is nearly all the products related to this task are mineral oil based. For example, spoon butter. It’s typically a blend of beeswax and mineral oil. You rub it into cutting boards and spoons to moisturize them, prevent cracking, and repel water. The wood soaks it up beautifully. I’ve been thinking, for years, that there must be an alternative to the mineral oil based spoon butter. It’s a by-product of petroleum production, and not something I want to ingest.
Beeswax to Use in Spoon ButterBeeswax to use in Spoon Butter

Thinking Through an Alternative

So, the way spoon butter works is quite simple. You rub it all over your wood-based spoons, handles, tools, and food preparation surfaces as a moisturizer and conditioner of sorts. Figuring out an alternative solution is a bit tricky. You need something to cut the beeswax, which is solid, snappy, and dense. Mineral oil brings a fluidity to the blend, and it allows you to slather. Swapping in another oil is the logical thing to do, but it’s not that simple because a lot of those oils go rancid quickly. Lately, I’ve been making a spoon butter with a blend of organic beeswax and extra-virgin coconut oil, and I like it! The coconut oil is quite stable, and won’t go bad quickly, and the wood laps it up. A coconut scent lingers, just a hint – actually quite nice.How to Make Spoon Butter

Buying Beeswax

You can typically buy beeswax in bars, or little pearls. The pearls are great because they melt quickly. The bars (above) are rough to cut. I typically cut partially through, and then snap a break on the cut line. That seems to be easiest.
How to Make Spoon ButterSpoon Butter

Before & After Spoon Butter

Here’s the before and after – parched spoons on top. And then below, just a few minutes later, after applying the spoon butter. Because, like beeswax, coconut oil is solid at room temperature, getting the ratio of oil to beeswax right is important. If you have too much beeswax, it’s impossible to get the spoon butter out of the jar. Coconut oil melts at 76F degrees, so with a high ratio of it, you scoop a chunk onto the surface your working on, and it quickly becomes spreadable.

Alternative Ideas: Let me know if you have other ideas on this topic – I’m all ears. A friend, who makes beautiful all-natural body products recommended I try broccoli seed oil. And as I was poking around, I noticed watermelon seed oil as well. Also, a number of people in the comments have enthusiastic suggestions, including a number for walnut oil. In the meantime, I’m pretty happy with this version & hope some of you give it a try! xo -h

Continue reading Spoon Butter on 101 Cookbooks

101 Cookbooks https://ift.tt/2XHCzkm

Friday, April 10, 2020

Spicy Sesame Coconut Rice


Rice has always been my top comfort food. It’s what my mom would feed me when I was sick, and the only food I ever wanted to escort me out of the haze of flu. As an adult, I vacillate between making beautiful, simply-cooked pots of plain rice and more elaborate creations that I think of as “wild style.” Lol. The simple preparations are the most comforting – basic brown short-grain rice with a bit of salt and (maybe) a pat of butter or drizzle of good olive or sesame oil. The wild style versions are the opposite. They’re exciting to make – even invigorating!  It’s when I grab from different cupboards, raid the spice drawer, and supplement the rice with other grains. I’m never 100% sure how things will turn out, but I make note of favorite wild-style versions in my notebook so it’s easy to revisit them. This Spicy Sesame Coconut Rice has lots of stars next to it.
Spicy Sesame Coconut Rice
This version isn’t over-the-top ‘wild” per se – you probably have all of the ingredients on hand. But it’s a combination that’s just off-beat enough to be special. This recipe makes a pot of brown rice cooked in a thin sesame-coconut broth. It’s showered with lemon zest and drizzled with sesame-chile oil if you like a bit of heat. It’s the kind of rice that goes nicely alongside a brightly cooked vegetable, and as the star component in whatever rice bowl you might be dreaming up.Spicy Sesame Coconut Rice
You can see the coconut rice here, served family-style for lunch yesterday. It’s pictured topped with tempeh crumbles, the last of an avocado, simple steamed asparagus, and scallion paste (just green onions pulsed with a splash of olive oil & a pinch of salt). If sesame rice isn’t your thing, but you want a way to get more greens on your plate, make a jump to Bryant Terry’s Amazing Green Rice, or browse all these other rice recipes.

A few favorite rice sources included: Massa Organics, Koda Farms, Lotus Foods, and Toiro Kitchen. If you’re on my mailing list, I also put a bunch of favorite rice links, books, and media in there & will link to it in the archives once it goes out. Enjoy! xx -h

Continue reading Spicy Sesame Coconut Rice on 101 Cookbooks

101 Cookbooks https://ift.tt/3a4bwCl