Labels

Friday, May 29, 2020

Zucchini Bread


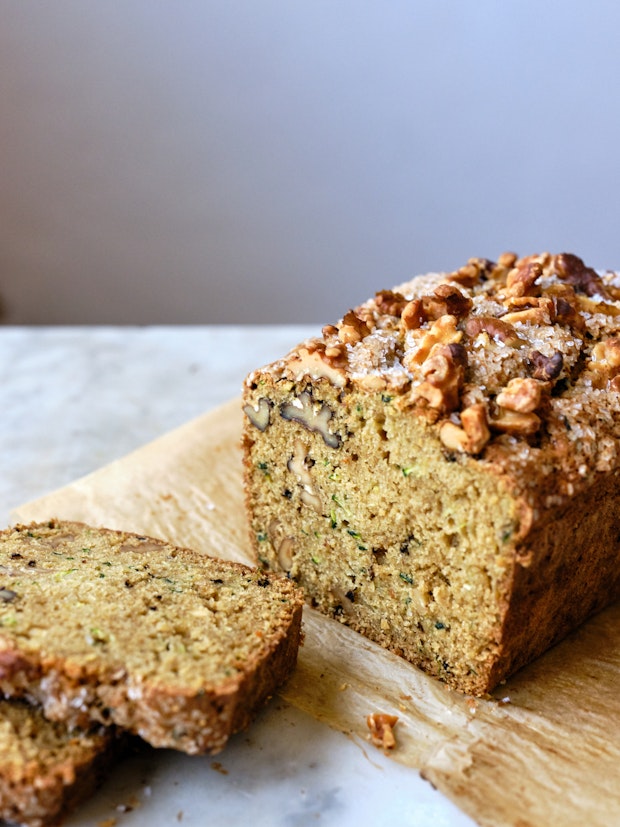
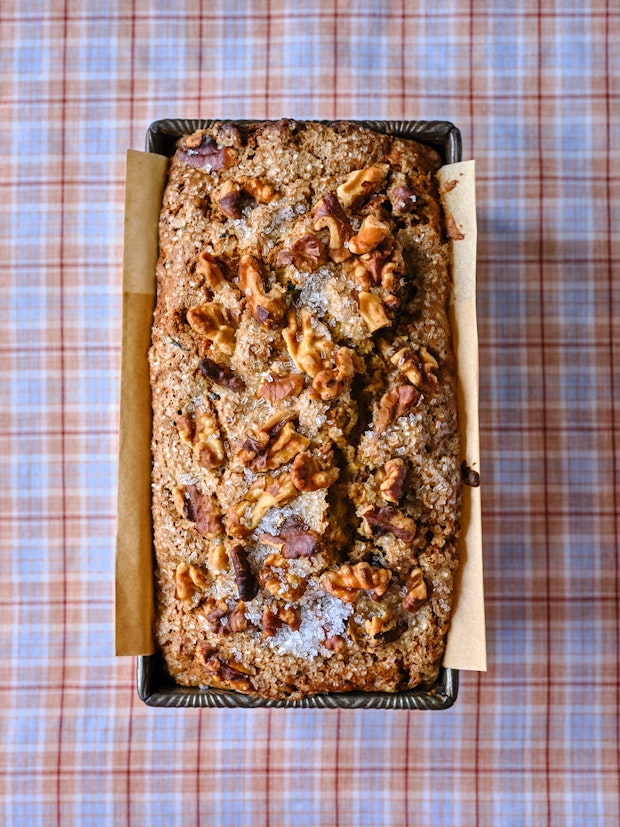
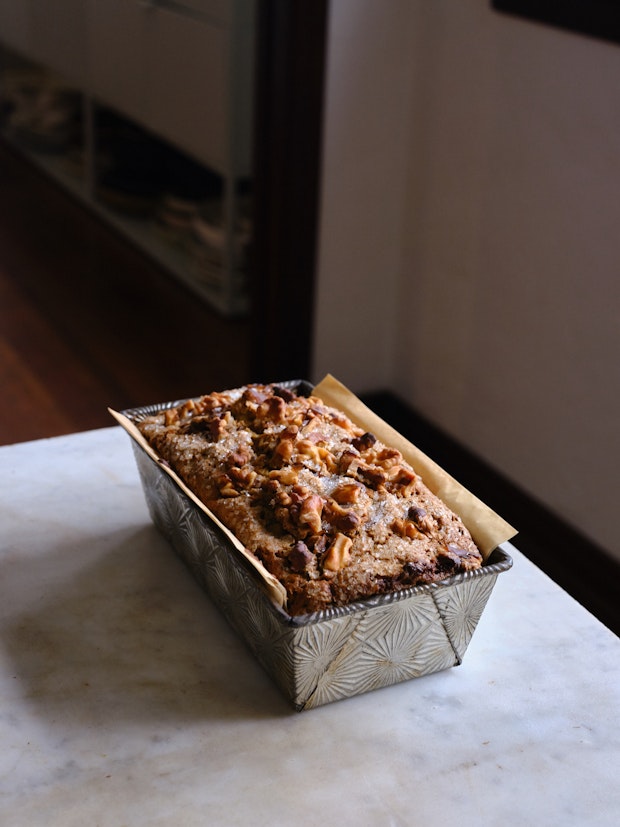
This recipe makes a single beautiful loaf of walnut studded zucchini bread. And a sizable one at that. For years I would load my zucchini bread batter with all manner of zest, spice, and whatnot. But that’s not how I roll anymore. Over the years I began to prefer this pared-down and more minimalist version. Moist, just sweet enough and loaded with toasted walnuts inside and out, it has a sweet nut-crusted top, requires just one pan and is a rustic stunner. If you’re looking for a go-to zucchini bread recipe, give this a shot.
Zucchini Bread Recipe

A Few Zucchini Bread Tips

Pre-grate & Freeze Excess Zucchini: When you have more zucchini than you know what to do with, grate it and divide 2 1/2 cup portions into freezer bags. Thaw and use with this recipe later in the year.

Too Much: If you’ve baked more zucchini bread than you can eat, slice it, divide with parchment paper, and freeze in baggies. When you’re ready for it, thaw and toast (or toast in a pan with a bit of butter).

Accurate Baking Time: A cake tester is important here. This is a big loaf and you want to make sure the interior is cooked though. If cake batter is visible on your tester keep baking in 7-10 minute increments. 

Yellow Summer Squash Are OK Too! You can basically use any summer squash you like here. Classic green-skinned zucchini are most typical, but you can also use eight-ball squash, patty pan, crooked neck squash, etc. I like to leave the skins on all of them for the color-flecks they lend to the batter. One thing to keep an eye out for is any squash that has developed seeds. Just scoop those out prior too grating.
Zucchini Bread Recipe

Variations

My Special Zucchini Bread: This is the more maximalist version of zucchini bread I’ve featured here since 2008. To the batter add: the zest of 2 lemons, 1/4 cup poppy seeds, 1/3 cup finely chopped crystalized ginger, 1 teaspoon cinnamon, and 1 tablespoon favorite curry powder. So fragrant!

All the Zests Zucchini Bread: Add the zest of 3 limes, 2 oranges, and 3 lemons. Consider swapping almond extract for the vanilla extract.

Basil & Lemon Zucchini Bread: Add 1/3 cup chopped fresh basil and zest of two lemons to the we ingredients. You can use Italian or lemon basil.

Zucchini Oat Bread: An idea I haven’t tested yet, but want to mention it in case someone wants to give it a try. Swap 1/3 cup of the flour for old-fashioned oats.

Raz el Hanout Zucchini Bread: I’ve baked a delicious version using a Raz el Hanout spice blend, highly recommended! Just add 1 tablespoon of Raz el Hanout to your dry ingredients.

Zucchini Bread Muffins: Yes, you can make muffins! Fill lined muffin tins 2/3 full – 3/4 if you’re living on the edge! And bake until golden and cooked through.
Zucchini Bread Recipe

More Zucchini Ideas

If you have a garden that is anything like ours, it’s putting off an incredible number of zucchini right now. Take a look at these zucchini recipes. I’ve been trying to come up with more recipes that put a real dent in the zucchini supply. So far, this Pasta with Smashed Zucchini Cream is a favorite, and this Grilled Zucchini & Bread Salad is perfect for summer & using up extra sourdough at the end of the week. And we love this Simple Sauteed Zucchini, especially with a little side action of this favorite pesto.
Zucchini Bread Recipe
Enjoy! And please leave notes in the comments if you have other variations you like.

Continue reading Zucchini Bread on 101 Cookbooks

101 Cookbooks https://ift.tt/2Mbe743

Friday, May 22, 2020

A Favorite Rice Noodle Stir Fry to Make with Whatever Green Veg you Have


If you messaged me this week after I posted a badly lit photo of an exceptionally tasty stir fry on Instagram, this is 100% for you!  It’s the kind of stir fry I pull together often, a catch-all of things needing to be used up. You’ve got silky rice noodles, bright and crunchy broccoli, toasted cashews, quick-marinated crumbled tofu, and pan-seared onions tossed in a feisty chile-boosted soy sauce. I added mushrooms the second time I made it (for these photos), but you don’t have to. I used broccoli, but you can use asparagus, shredded brussels sprouts or kale. I’ll talk more about that down below. I definitely tend to do that thing you’re not supposed to do here – overload the pan- but it’s the kind of one-pan meal I love. Enjoy!

A Fave Rice Noodle Stir Fry Recipe
A couple things before we get to the recipe. If you make a lot of stir fries, consider investing in a wok. The cast iron wok I bought with Grace Young from The Wok Shop in San Francisco years ago is one of my prized cooking vessels (this is the one). It’s the kind Cantonese home cooks swear by to impart the coveted taste of wok hay. I’m not saying I’m there yet, but I aspire. And if you don’t have a wok, don’t let it deter you – grab your largest skillet and use it for your stir fry.
A Fave Rice Noodle Stir Fry with Whatever Green Veg you Have on Hand

A Few Stir Fry Variations

I’ll put most of this in headnotes of the recipe as well.

Green Vegetables: I’m writing this recipe up using broccoli as the green vegetable here, but you have lots of other options. Use an equivalent amount of asparagus (1 1/2-inch segments), or 4-5 big handfuls of , chopped kale, pre-cooked artichoke hearts are fair game, or peas, (or pea shoots!). You see where I’m heading? This is all really adaptable based on what you have on hand.

Make it a Little Creamy: A splash of coconut milk toward the end is nice.

Citrus is Good: One of my favorite finishing touches here is to throw something citrusy in at the end. I have a market lime tree on the patio, so I often sliver a couple leaves razor thin and add them at the end. Lemon zest, Meyer lemon zest, and/or orange zest is equally welcome here. Totally not necessary, but it really is a nice touch.

A Fave Rice Noodle Stir Fry Recipe

Boil versus Soaking the Noodles

I’m having you boil the noodles here to get them just the right amount of tender. It’s what I did to get dinner on the table quickly the other night, and works great. The common alternative is to soak them, but there is such a wide range of noodles out there, and I’m sure you’ll all use quite a range of them, so I think boiling them is the safest bet for consistency across the board. Depending on the noodles, sometimes the soak technique doesn’t work, and you end up boiling them anyway.

Recipe Journal Entry of a Stir Fry with Handwriting and Photo
Here’s the photo I posted taped in my recipe journal along with notes about how to make it after dinner the other night. I do this when I want to remember something I liked so I can make it again at some point. You can see the size of the noodles I used (left-hand page), and I also like to leave “next time” notes to myself (down in the corner) – ways to tweak, flavors or ingredients to add or explore, etc. Enjoy!

Continue reading A Favorite Rice Noodle Stir Fry to Make with Whatever Green Veg you Have on 101 Cookbooks

101 Cookbooks https://ift.tt/3enBV0T

Friday, May 15, 2020

Chocolate Dipped Biscotti


Sesame studded and heavily scented with crushed fennel seeds and chamomile, these chocolate dipped biscotti punctuated my espressos all week. They were the petite treats I’d looked forward to. If you’ve never baked biscotti before, they’re a lot of fun, and quite adaptable. The main thing? You double bake them. First with the biscotti dough shaped into a long loaf. And a second time after you’ve baked and sliced those loaves into biscotti.

Chocolate Dipped Biscotti Recipe
You can play around with the flavors here, but the way the fennel seeds and chamomile complements the chocolate is really fantastic (I used, and loved, Guittard 66% organic semisweet). That said, I’ll offer up some alternative suggestions down below, because I totally get that not everyone keeps chamomile around 😉 xx!
Chocolate Dipped Biscotti Recipe

Biscotti Tips:

A couple things I should point out:

Rolling Technique: First, make sure to roll your dough into a tight shape (pictured below). This way, when you go to slice your biscotti after the first bake, they’ll hold their shape. You don’t want crumbling biscotti going into the second bake. A serrated knife is the way to go for slicing, using a quick sawing motion, and not too much downward pressure.

Texture and Baking: If you like a cake-y biscotti, slice them a shade thicker and bake them for a hint less time. If you like a crunchier, more structured biscotti, slice them a shade thinner, and bake them a bit longer (consider flipping them toward the end to really get both side toasty).

Storage: On the storage front. They’ll keep in an air-tight container for a couple of weeks.

Chocolate Dipped Biscotti Recipe

Variations

Herbs: I love herbs like rosemary, thyme, and lavender in biscotti. You can experiment with those. Chop and add to your dough with the other dry ingredients. Go easy, make notes, and adjust each time you bake them. A teaspoon is a good place to start.

Spices: A bit of turmeric, cinnamon, ginger, cloves, all are welcome here. Basically if it’s a flavor you can imagine being good in a muffin, it’s fair game here. Or, pre blended spices. My favorite chana masala blend is magic here, and garam masala is a good fit as well. 

Citrus Zest: Lemon zest, makrut lime zest (or minced leaves), orange zest – all add a sunny punch of flavor.

Outer Texture: I rolled these biscotti in sesame seeds to add some texture and boost the flavor inside the cookies, but you could go in all sorts of directions. You could roll them in large grains of sugar, for a crunchy, shardy texture. Or, poppy seeds (or a blend of seeds) could be nice. Or, you could add some sort of flavor boost or ingredient to the egg wash you do before the first bake.
Chocolate Dipped Biscotti Recipe

This is what my biscotti looked like when they came out of the oven after their second bake. Once you’ve sliced your biscotti, for the second bake, you can put them all on one pan. They’ve already risen, so you don’t need to distance them the way you would with most other cookies.
Chocolate Dipped Biscotti Recipe
If biscotti aren’t your thing, but you’re still up for a baking adventure, I love these brownies, this Devil’s Food Cake, these snickerdoodles, or the swirl cake from last week.

Continue reading Chocolate Dipped Biscotti on 101 Cookbooks

101 Cookbooks https://ift.tt/2ZaAzC2

Saturday, May 9, 2020

Chocolate Almond Swirl Cake


Buckle up everyone. I’m going to counter all the recent bean recipes with a birthday cake. It was Wayne’s birthday this week and I felt like a special cake was in order. I wanted to make something that looked classic from the outside, with a surprise when you slice into it. I also wanted to combine all the flavors he loves – chocolate, olive oil, almond, and a good kiss of salt to balance the sweet. He’s always showing me photos of crazy cakes, so I thought it’d be fun to bake him some sort of a swirl cake.

Chocolate Almond Swirl Cake

The Swirl Cake Game Plan

Swirl cakes, zebra cakes, and tiger cakes all have three main components: the base cake, the swirl, and the frosting or icing. For this version I made an incredibly moist and fragrant olive oil cake to use for the base and swirl. It’s a favorite made with yogurt which helps keep things tender. The tangy note of the yogurt nicely balances out the sweetness as well. And then there’s the frosting. The frosting here is classic chocolate buttercream bolstered with an entire tablespoon of almond extract. On the swirl front I ended up doing two versions to see which one I liked better – one I envisioned with a hot pink dragonfruit or raspberry swirl (I had such high hopes!!), and another with classic chocolate. 
Chocolate Almond Swirl Cake

How to Assemble a Swirl Cake

This is what a swirl cake looks like (above) just out of the oven. When you slice into it you get beautiful striping and swirls depending on how you layer or swirl the batter. For a cake like this I use a ratio of about 2 parts yellow cake batter to 1 part chocolate cake batter. You do 2 big spoonfuls of batter into the center bulls-eye of your prepared cake pan, and then top it with one spoonful of chocolate. Repeat until all the batter is gone. Always placing the batter onto the bulls-eye.Chocolate Almond Swirl Cake Recipe

The Frosting

Before we get to the details, just a reminder to let your cake cool completely before you attempt to frost it. And before you go to mix up your buttercream, make sure your buttercream is at a nice, mild, room temperature. Not too warm, not too cool. You want it to whip up nice and billowy. If your kitchen is too warm, and your butter is starting to get a little sweaty looking as you mix it (or at any point, really). Just give it a few minutes in the refrigerator.Chocolate Almond Swirl Cake
To make this shape cut a square cake in half, and stack.

A Tasty Fail

You can see a couple of in-process shots (below) of the version of the swirl cake made with dragon fruit puree. You know those smoothie packets? I pureed one of those. And it looked incredibly promising all through the bake. The disappointment came when you sliced into the cake. If you were expecting bold stripes, no dice. But if you were expecting a really delicious cake, we’re still in business. If you want to make this version – do it for the flavor, not the visual. Mix 1/4 cup of the puree into about half of the yellow cake batter, and skip the cocoa. 
Chocolate Almond Swirl Cake
Before the bake (above), after the bake (below). 
Chocolate Almond Swirl Cake
Swirl cakes are a lot of fun. And you can play around with all the different components of your cake if you have another frosting you like, favorite base cake recipe, or even the shape. 

Or, if swirl cakes aren’t your thing but you still want to make something sweet and tasty try these brownies, this Devil’s Food Cake, this popular chocolate cake, or skip the cake altogether, and churn up some berry swirl ice cream.

Continue reading Chocolate Almond Swirl Cake on 101 Cookbooks

101 Cookbooks https://ift.tt/3bg4VFL

Friday, May 1, 2020

Homemade Refried Beans


If you’ve only had refried beans from a can, this should be the next recipe you cook. Homemade refried beans are a game-changer. They’re simple to make and having them on hand makes it simple to throw together meals for days. Think tacos, tostadas, chilaquiles, and next-level bean dips. There are a lot of opinions about how to make refried beans. I’ll just say this: when I’m home alone, and there’s no one else to share a meal with, this is how I cook them. This version is so incredibly good that I usually just enjoy them by the spoonful. But it’s also so simple that I didn’t think to share the recipe here until a number of you asked when you saw me cooking in one of my Stories recently. So here we go!
Homemade Refried Beans Recipe

My Refried Bean Technique

The way I cook refried beans is quite straight-forward, although I do have a couple somewhat unconventional moves that I stand by. I like my beans with depth and flavor, while still maintaining some brightness and lightness. I use just the right amount of olive oil to cook well-minced onions along with the beans and plenty of their broth. Smoked paprika adds a hint of smoky depth you can’t quite put a finger on, while keeping things vegetarian. My secret ingredient is a finishing splash of freshly squeezed lemon juice. I think it’s the element that helps keep the beans from seeming too heavy, and the acidity counters the starchiness of the beans. Don’t skimp on the lemon juice.
Pinto Beans in a Clay Pot

Good Beans Matter

I feel like a bit of a broken record. You hear this from me every time I feature a bean recipe. Try to purchase dried beans from a source that has good turnover. You don’t want to buy a bag of dusty, sad beans that has been on the shelf too long. Bulk sections of grocery stores often move through their beans and pulses quickly, or keep your eyes peeled for dried beans at your local farmers markets, co-ops, and the like. Or, search around for heirloom beans online – there are so many wonderful beautiful varietals. I use pinto beans here, but you can certainly explore other types of beans – black beans, cranberry beans, etc. Play around!
Homemade Refried Beans Recipe

Mash Before Cooking

One last thing I’ll mention before we get to the recipe. A lot of people like to mash their beans at the end of the cooking process, but I usually do it at the beginning. It’s less messy this way, you aren’t working over a hot burner, and I find it easier to get the the consistency just right. I’ll mention it down below, a potato masher is great for this. Any mashing tool: a pestle in a bowl, a big fork, whatever can smash beans. A few pulses with a hand blender can also work, but I like the consistency you get from doing it by hand, and there’s no extra appliance to wash.

I hope you try these! They really are one of my favorite simple culinary pleasures. And if you’re on the lookout for other bean inspiration I’ve done this post about how to cook beans that are tender, creamy and nearly perfect using an easy, lower temperature long cooking method. Enjoy!

Continue reading Homemade Refried Beans on 101 Cookbooks

101 Cookbooks https://ift.tt/2YrBrBN